You are using an outdated browser. Please upgrade your browser to improve your experience.
How To Securely Remote Control Your Mac From Your iPad (Part Two)

How To Securely Remote Control Your Mac From Your iPad (Part Two)

August 8, 2011
In part one of my article How to Control Your Mac Using Your iPad I went over the steps to create a VNC connection from your iPad to your Mac using the Screens iPad application. Building on that, in part two of this article, I will go over how to make your connection secure using a technique called "ssh tunneling." If you plan on connecting to your home computer from outside your home network, I highly recommend you go this route, as the activities you perform over the Internet will be encrypted. The steps below are for connecting over the Internet to your Mac using Screens. If you are on your personal local network, you probably won't need to follow these steps and can just use the "Nearby Computers" feature to connect to your desktop. Before beginning, do this quick check:
  1. Make sure you have turned on Screen Sharing on your Mac and have picked a user account for logging in
  2. You are able to successfully connect to your Mac via your WAN IP address over port 5900
  3. You've configured your router's port forwarding/virtual servers to forward the request to your local computer
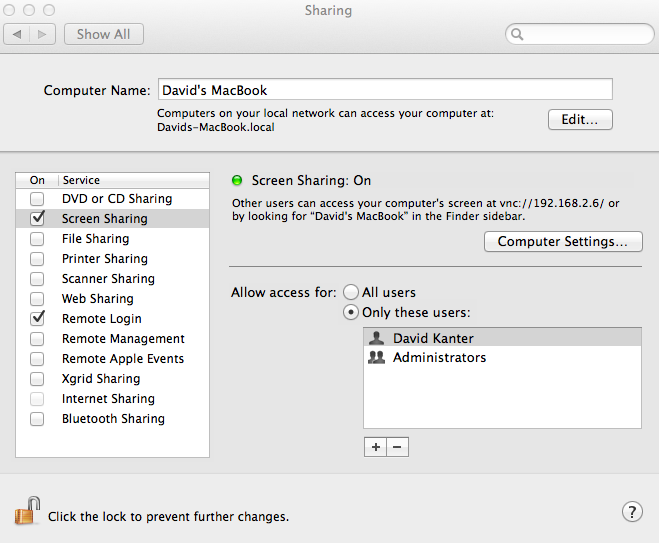
  If you're unable to this, please review the first part of this article, or you may have difficulty setting up the secure connection. Allow Remote Connections On your Mac go to the sharing preferences and turn on Remote Login and Screen Sharing. On both of these options, enable a user account account for logging in. In part one, you may have setup a special password for the VNC connection. Since upgrading to Lion and upgrading Screens to 1.6, we will just use the native OS X Unix user accounts and system passwords.

Update Your Router/Firewall Using your router/firewall Web configuration settings, disable the port forwarding over port 5900, and enable ssh port forwarding over port 22. You will want to forward this port to the same IP address as you did in part one. If you don't know what your local IP address is, you can look at the network settings in your sharing preferences to see.

Update Screens for SSH Tunneling On the iPad, open Screens, and go into the connection settings you created in part one for your VNC connection to your Mac. Enter the public IP address in the General Info Address area. If you don't know what your public address is, you can obtain it by logging into your router or by going to http://www.checkmyip.com. On the iPad screens change your authentication method to OS User Account. Put in your username. Note this will be the Unix style login which is typically the same as the name of your home directory, without spaces. You can decide if you want to hard-code the password into Screens or just type it in each time you connect. If you do store it in Screens, make sure you enable the iPad PIN locking.

In the SSH Tunneling section, enable it, and enter in your username. Everything else can be left blank.

At this point you should be able to securely connect to your Mac from anywhere in the world by tapping the Screens entry you've just created. If you didn't save the password locally on your iPad it will prompt you for it when you first try to login. I use this technique frequently to access my computer from work when I need a file, or want to check on the status of a backup. The other advantage of this method is that you're only limiting your home computer's exposure to the Internet over secure port 22. In addition, you're not paying a third party provider a monthly fee for the privilege of using your own computer. What other solutions have you seen or used for remote access to your home computer from you iPad?

Mentioned apps

$19.99
Screens VNC
Screens VNC
Edovia Inc.

Related articles