You are using an outdated browser. Please
upgrade your browser to improve your experience.

This is the WiFi version

KinderBot
by RAMOT at Tel Aviv University LTD


What is it about?
This is the WiFi version.
App Screenshots

App Store Description
This is the WiFi version.
*** Usage
Prepare a Lego EV3 Kit, a certified WiFi dongle for the EV3, Apple iPad2, iPad3, iPad4, iPad Air. only netgear WiFi dongle.
*** Build your Robot Car
The Robot is expected to be a two motorized wheels, plus a roller caster wheel at the back. Using the left and right motors, the robot can steer forward, backward, left and right. Two sensors are expected to be connected: light or color sensor and a Touch sensor.
*** Parts you need
Brick, Two Motors, Two Wheels, One Roller/Caster Wheel or equivalent, One touch sensor, One color, Optional one distance sensor. Other parts for building the robot's body.
[1] Connect your Lego EV3 to a WiFi network. The Lego brick should have a connected WiFi dongle by NetGear as stated by Lego Documents.
* Note that the Lego Brick support wpa2 key or No password. Second, the password should have only letters and number.
[2] Connect your iPad to the same WiFi network.
[3] Start KinderBot WiFi-Version on your iPad.
[4] Build your Robot Car.
[5] No Bluetooth is supported in this version.
[6] KinderBot was tested on iPad 2 and iPad AIR and works with Lego EV3 Firmware 1.07H and up.
*** Operating the App ***
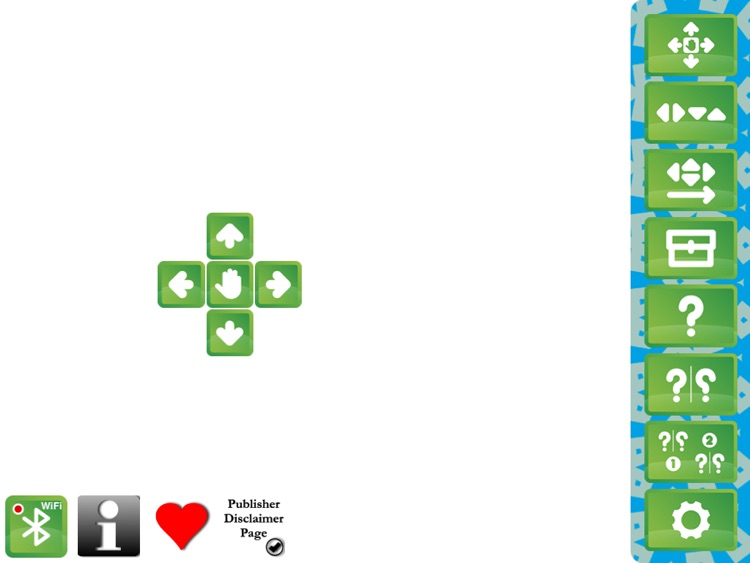
KinderBot has a single screen App. On the top-right you have the moving-menu. The menu buttons are as follows, from top to bottom:
[menu 1] Remote control mode. Just move the robot forward, backward, left and right. The robot moves in steps of about 20 cm.
[menu 2] Immediate-recording mode. The robot moves and KinderBot records the motion commands up to 30 commands total.
[menu 3] Delayed-recording mode. KinderBot records up to 30 commands. The robot may execute these commands when the PLAY BUTTON (upper left corner of screen) is being pressed ONCE.
[menu 4] Procedure-mode. In this mode, the user can design up to 3 different procedure (ICONS are COLORED PACKAGES). Each procedure may be edited and contain up to 30 commands.
Delete a command by touching it again when it is in the 3-lines bar.
[menu 5] single-if-mode. This is the first robot-programming screen (We have three of them). Here, you can drag and drop a single command or a package ("procedure") to the single slot. Also, you may select the sensor type: touch-on, touch-off, light-on, light-off, distance-on, distance-off.
After editing, press once the "DOWNLOAD-TO-BRICK" icon (screen top left). If you see the OK icon (in-blue), the program is on the brick and you can start/stop it using the PLAY/STOP buttons.
[menu 6] if-else-mode. This is a programming screen where you can state two different commands to the TRUE part of the if-statement and the FALSE part. For example, you could program this:
IF "TOUCH-IS-ON" "go-back-command"
ELSE "go-forward-command"
Or for a "bump-car-robot" do:
IF "TOUCH-IS-ON" "do-command-procedure-green"
ELSE "go-forward-command"
and the "green-procedure" may contain THREE COMMANDS = [BACK, BACK, LEFT]
[menu 7] double-rule-mode. Here you can program two parallel IF-ELSE RULES. For example:
IF "TOUCH-IS-ON" AND "LIGHT-IS-ON" THEN "go-backward-command"
[menu 8] Settings and Calibration screen.
*** Troubleshooting ***
[1] If the WiFi network goes down, restart your EV3 and the KinderBot App.
[2] After the Brick WiFi is enabled, check if the NetGear WiFi dongle blue-led is blinking every 5 to 10 seconds. If so, its OK. EDIMAX ew-7811Un works also.
[3] The robot turns left instead of right -> go to settings screen, remove the motor settings icons and reconnect them again (drag and drop) in the opposite order
[4] The Touch/Color sensor does not seem to respond to your program -> go to settings screen and test your INPUT PORTS connections. The App marks what INPUT-PORTS are valid.
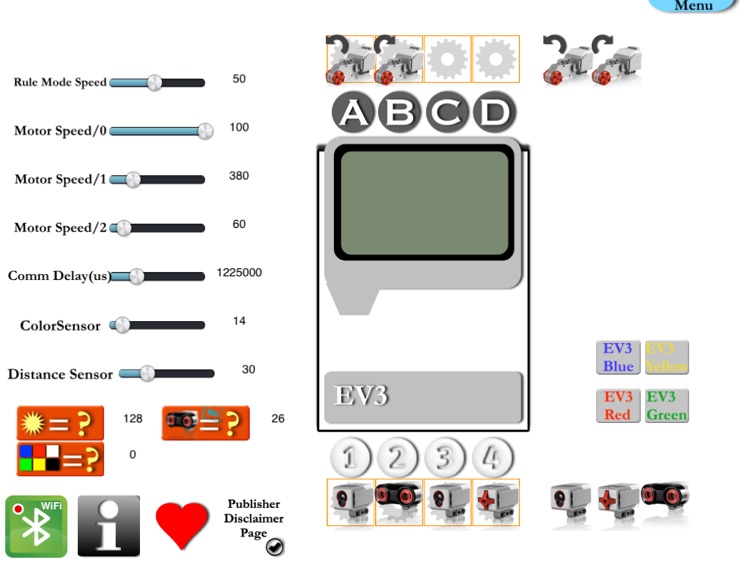
*** Settings/Calibration Screen ***
The password is 123456, Next Button.
[1] setup EV3 motors and sensors ports. You have to properly connect TWO motors and up to 4 sensors.
[2] rename your EV3 9one of 4 names)
[3] read the color and distance sensors
[4] calibrate the two motors speeds
Disclaimer:
AppAdvice does not own this application and only provides images and links contained in the iTunes Search API, to help our users find the best apps to download. If you are the developer of this app and would like your information removed, please send a request to takedown@appadvice.com and your information will be removed.
AppAdvice does not own this application and only provides images and links contained in the iTunes Search API, to help our users find the best apps to download. If you are the developer of this app and would like your information removed, please send a request to takedown@appadvice.com and your information will be removed.