Photogene² Is A Powerful And Feature-Packed Successor That Belongs In Your Photo App Collection

Photogene² for iPhone ($0.99) by Omer Shoor is a completely new app from it’s predecessor, reworked from the ground-up. It’s much faster, sleeker, and just plain awesome.
With Photogene², you have the option to import photos from your device or snap new ones.
If you choose to snap a new photo from the app, you’ll have a curved toolbar at the bottom. The option for flash and front-facing camera (iPhone 4 and 4S) are at the top. The bottom toolbar will have five buttons: close (go back to the Camera Roll), Last Photo, Shutter, Stabilizer, and Filters. The stabilizer will make it so that the app only takes a photo when the phone is completely steady, which is great for those of you with shaky hands. The filters will allow you to get a live preview of the shot and how it looks with the applied filter. Selecting one will have it be applied on the viewfinder, and you can shoot the photo that way.
For those that want to use Photogene² to edit existing images, no problem. You will have access to the Photo Library on your device as soon as the app is opened (with the camera option in the top left corner). Your albums will be separated into what appears like stacks of Polaroids, and any time there is a new photo added (like if you take a screenshot), the Photogene² will automatically update the albums accordingly. When you go to view an album, your images will appear in thumbnails. There are three thumbnail sizes: small, medium, and large.

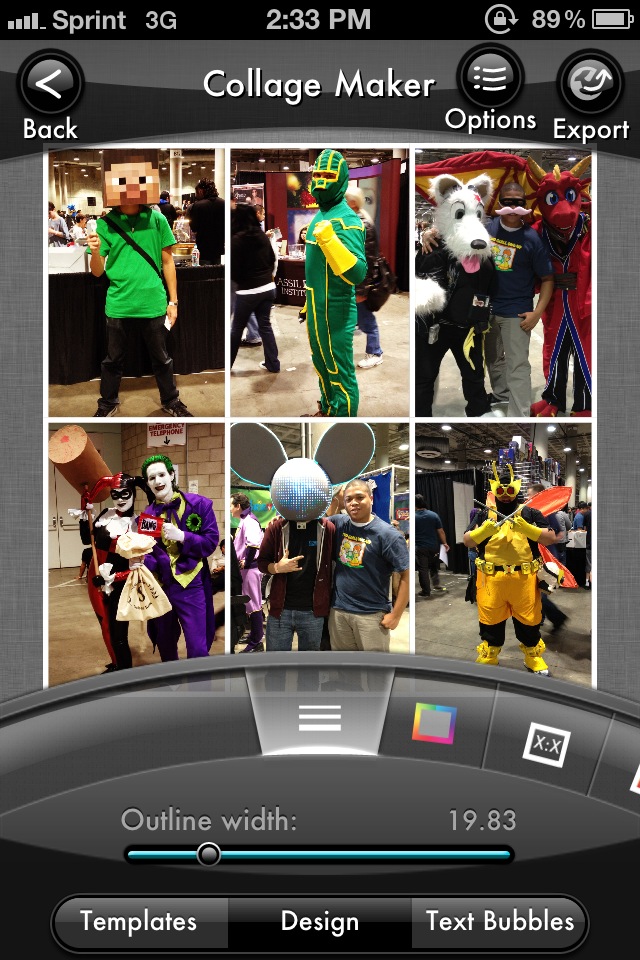
In addition to viewing your album images, there are some nice features added to this screen as well. You can select a batch of photos to export, add to a collage (there are several different layouts and frames available), or even an album created in Photogene². Star ratings can be assigned to selected photos, as well as export status. There are plenty of features that this new version offered that was never seen in the previous version, which makes it worth the upgrade alone. And we’re just getting started, believe it or not!
When you select an image or take the new snapshot you just took, there is a myriad of options to enhance your image. The image will be centered in the screen, though you can move it around as you please just by dragging it. Tapping on the bottom semicircle button will bring up the seven options available for editing: Crop, Rotate, Adjust, Presets, Retouches, Text, and Enhance.
The Crop option gives you the ability to crop the image as you please. If you’re looking for a specific ratio, they will have several different ones waiting for you with a tap of the top button. To apply the crop, just tap on Crop. If you change your mind, there is a cancel button, or a reset button if you want to try again.
Rotate gives you the ability to rotate the image at various angles, as well as flipping the image vertically and horizontally. If the default angle of rotation does not satisfy your needs, there is the option to adjust the angle.
Adjust provides users with plenty of settings to tweak their image to perfection. The settings are what you’d expect from any serious photo editing app: Brightness, Colors, Whitebalance, Shadow/Highlight, Sharpen, Denoise, Histogram, RGB, and Curves. Every single one of these is adjustable with sliders, and the curves allow you to modify it however you please. Photogene² doesn’t cut down on features one bit here.
Presets is probably the most fun option for casual users, since this is where the filters and frames are. There are five presets: Colors, B&W, Vintage, Frames, and Fun. Each one will have several different filters and effects to spice up your photos. While the first four are pretty self-explanatory, the Fun presets will be a mix of outrageous frames (like film strips) and filters. I found the speed of applying these effects to be extremely fast, as the changes would be applied the second I move the slider left or right, or just tapped on one. Of course, this is on an iPhone 4S, so it may not be as fast on older devices, but it was extremely smooth on the latest iPhone.
Unfortunately, it seems that you can only apply one of these at a time during the editing session. This is a huge flaw, and I would like to see the ability to add multiple presets at a time in a future update. If you insist on having multiple presets, you’ll have to save the first edited image first, then import it and edit again, and repeat. It’s a hassle that can be easily eliminated.
With the Retouches section of tools, you’ll get the right stuff to make bad photos right again: Heal, Red Eyes, Dodge, Burn, Blur, Grayscale, Effect, and Custom (this is a Pro-only feature, available as a $5.99 in-app purchase). The Text tool will give users the ability to add little speech bubbles and captions to their photos, with plenty of options for line, fill, and text color, as well as different fonts, drop shadows, and more.
Finally, the last set of tools is found in the Enhance menu. From here, you can add a vignette, center focus, a gray radius, one of many more filters (these are different from the presets), reflection, background color, and various framing options.
To save your edited image, you can tap on the Export button, which will be in the bottom right corner when the semicircle tool menu is hidden. You can choose the size of the saved image, as well as the compression strength (for full quality, put it at 1.00 – this will decrease compression, but increase file size). A Watermark option is there, but it is only available to Pro users. The image can then be saved to your photo library or shared on various social networks, FTP, email, Dropbox, or printed.
There are two other buttons that are next to the Export button: Original image (for comparison) and EXIF data. Both are handy to have, and round out the plethora of powerful features that are found in the app.

The settings for Photogene² can be accessed at any time throughout the app via the “i” button in the top right corner. This button brings up the about section, Application Settings, and some FAQs, as well as ways to contact the developer, view their website, and even a tutorial to show you the basics.
In Application Settings, you can set the default export resolution, toggle file names, use the new Twitter composer on export, and restore in-app purchases. There are some maintenance options, though I’m not sure how important they are for the average user (reset DB, fix DB, email diagnostics, and check DB). If you would like to apply for beta-testing, you can send your device UDID right to the developers.
If you had the previous version of Photogene and choose to upgrade to this new version (the $0.99 sale price lasts until November 17, and then will probably be $1.99 like the original was), you’ll get a nice bonus. The bonus for upgrading users is a free in-app purchase of their choice (naturally, I chose the most expensive option of going Pro). So if that isn’t enough to entice you to pick up Photogene², then I don’t know what is.
I liked the app very much, and just hope to see the ability to add multiple preset options to a photo at the same time, rather than having to save it and then going back to editing. Besides that, the app is great and packs tons of powerful features that will benefit any iPhone photographer.
It’s highly recommended to pick this one up at the $0.99 price before it’s too late.