
The Best Way to Recover Data From iCloud Backup
It’s like a root-canal procedure: It’s beneficial, but it’s not necessarily something you want to be going through. And by “it” I mean the rather precarious act of restoring iOS device data from iTunes or iCloud backup.
Backing up your iOS device via iTunes or iCloud is easy enough. Simply, connect your iPhone or iPad to a computer and iTunes will auto back it up, or better yet, make sure you have iCloud backup switched on to have it happen without any effort at all. Backing up your device is convenient and it lets you rest assured that your data (including messages, contacts, notes, photos, and more) is kept safe and recoverable in the event your device is lost or stolen, broken or otherwise damaged, or your device might be superseded by a newer model or a different unit. Unfortunately restoring all the information captured in these backups is not as straightforward as you’d expect and it’s not without its inherent risks and drawbacks.
You see, iTunes or iCloud backup restoration as we know it is all or nothing – replacing all the information on the device itself. It’s not meant to just have a backup of your data. You can’t browse it on a computer, or just maintain a copy that you can store along with other files in your backup system. Apple’s recommended steps for restoring from a backup requires that you make use of the entirety of the backup, with no way to select the specific content to retrieve.
Fortunately, there exists a third-party tool, one which we here at AppAdvice have tried, tested, and can recommend that you can use to customize your iOS device backup restoration experience.
The Apple way
How to restore backup from iTunes or iCloud
Using traditional methods, iTunes & iCloud backups are not browsable backups, Apple intends for them to be restore points only.
You can restore from backup via iTunes or iCloud, depending on which you’ve opted for as the channel for storing your backup. Either way, these backups are solely for the purpose of restoring an iOS device back to the state of when it was backed up. You will not be see what data is available in backup, or choose to only partially restore some of the backup.
Restoring from iTunes backup

To restore your device from an iTunes backup, you must have access to the computer on which you generated the backup you wish to install, or transfer that backup to another computer.
Connect your device to the computer.
Open iTunes to start with the procedure.
Go to File > Devices > Restore from Backup, or else click the device button.
Go to the Summary tab.
Click Restore Backup.
If Find My iPhone is enabled on your device, you first have to turn it off by going to Settings > iCloud > Find My iPhone on your device.
Choose the backup file you want to restore from the available selection.
Be sure to check the indicated device name and date of each backup to ascertain the most appropriate one for your device.
Click Restore and wait a while for the process to run its course.
Restoring from iCloud backup
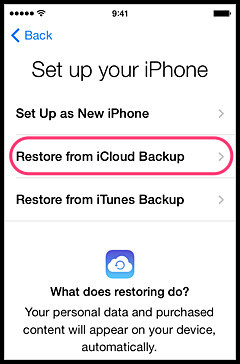
Restore from iCloud Backup
Restoring from an iCloud backup is not as straightforward as restoring from an iTunes backup. This is mainly because iCloud backup restoration is possible only through the Setup Assistant mode. And to go to that mode, you, unfortunately, have to first remove all information and settings from your device by going to Settings > General > Reset > Erase All Content and Settings. After your device is erased, it goes into Setup Assistant mode beginning with a Hello screen.
Swipe on the screen to start the setup process.
Join a Wi-Fi network.
Tap Restore from iCloud Backup.
Sign in with your Apple ID.
Pick your preferred backup, and wait for the backup to be transferred from the cloud to your device.
Depending on the size of the backup and the network speed, the process may take some time. You might want to grab some coffee and catch up on the news while waiting for it to finish.
Apple’s is not necessarily the best way
'Fone' the 'Dr.' instead
In most cases, restoring from an iTunes or iCloud backup using Apple’s official methods does the trick. But in some, they may be neither the most applicable nor the most advisable.
For one thing, backups tend to be large and require long waiting times for their installation to complete. The process then can be tedious and prone to unexpected interruptions that may result in further loss of data. This is especially true when restoring from an iCloud backup, which can be risky in the presence of a not so reliable Internet connection and which necessitates the deletion of current device content and settings in the first place.
Restoring backups is an all-or-nothing decision
And as mentioned, under Apple’s prescribed procedures, restoring backups is an all-or-nothing decision. Either you make use of the entire backup or you don’t restore from backup at all. This can be problematic particularly if you have existing content and settings on your device that you don’t want to be supplanted by what’s on the backup.
There are also cases in which you only wish to recover individual files and types of content — perhaps something you accidentally deleted — from a backup or, more demandingly, from two or more different backups.
In such cases, a recovery tool like Wondershare Dr.Fone for iOS can prove indispensable.
Just what the Dr. ordered
Dr.Fone’s prescription
Developed by Wondershare for Mac and Windows, Dr.Fone is a free-to-try desktop application that offers a far more customizable approach to iOS device data recovery than Apple’s methods do. It can be of great help to you if for any reason you don’t want to restore completely from iTunes or iCloud backup, as it can break down the backup into various categories by file type and present previews of files before recovery.
Depending on your device and backup, Dr.Fone can extract and offer previews for the following types of files: camera roll photos, photos and videos in supported apps like Aviary and VLC, messages and attachments in the Messages app, contacts, call history, voicemail, WhatsApp messages and attachments, Facebook Messenger messages and attachments, notes, calendar events, reminders, Safari bookmarks, voice memos, and documents in supported apps like Editorial.
With this roster of compatible file types, Dr.Fone also enables you to access and save backup data, such as messages, photos from messages, call history, and voicemail, that otherwise cannot be selectively accessed and saved. Further, it lets you save data on your computer or on a cloud service such as Dropbox, thus doing away with potential data loss from overreliance on Apple’s over-the-air backups.
Evidently, Dr.Fone offers more control and granularity over iOS device data recovery, and it does so with an iOS-inspired interface to boot.
Before using Dr.Fone on your computer, first make sure that iTunes is closed so as to avoid data overwriting by synchronization. Note that your device need not be connected to your computer for Dr.Fone’s iTunes or iCloud backup operation to work.
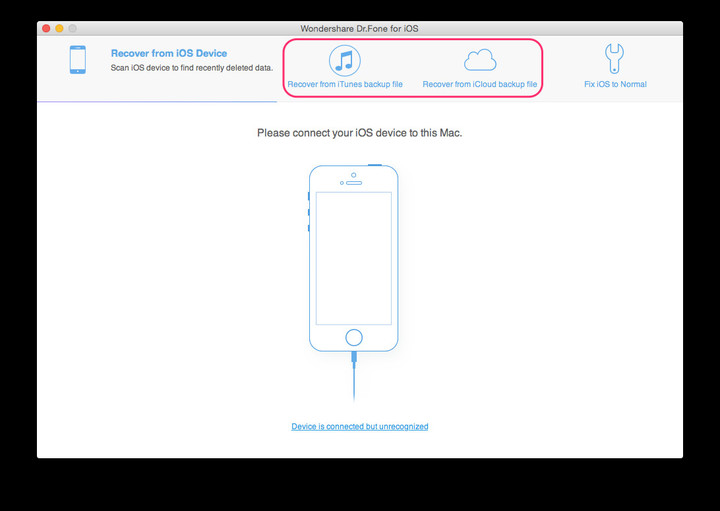
Dr.Fone is in.
Scanning iTunes backup
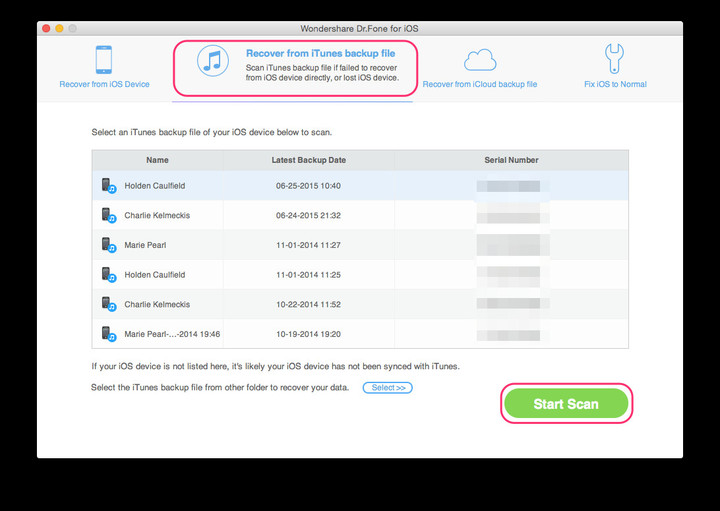
If you wish to extract information from an iTunes backup, follow these steps.
Click the “Recover from iTunes backup file” tab on Dr.Fone’s home screen.
Choose your preferred backup file according to its indicated device name and date.
Click Start Scan to commence scanning of files from the backup.
Wait for the scan to complete and then proceed to the “File preview and recovery” section below for the rest of the steps.
Scanning iCloud backup

If you want to take down files from iCloud, follow these instructions.
Click the “Recover from iCloud backup file” tab on Dr.Fone’s home screen.
Sign in to iCloud with your Apple ID.
Wondershare maintains that signing in to iCloud on Dr.Fone is private and secure. You may encounter some sign-in issues if your Apple ID is protected by two-factor verification, even when you’re using an app-specific password.
After signing in, select your preferred backup file based on the indicated device name, date, size, iOS version, and iCloud account.
Click the Download button for your selected backup.
Choose the types of files you want to download.
Click Next to start scanning of files from the backup.
Wait for the scan to complete and then proceed to the “File preview and recovery” section below for the rest of the steps.
File preview and recovery
Whether working with an iTunes or iCloud backup, Dr.Fone offers the same post-scan functionality, which allows you to explore and preview the scanned files by type and recover items collectively or individually.
You can also opt to display deleted items only when previewing certain file types, including photos, messages, message attachments, contacts, call history, notes, calendars, reminders, bookmarks, and voice memos. This is useful if what you’re looking for is something that has been deleted from your device by the time of the backup.
You can also find specific files by typing keywords into the search bar.
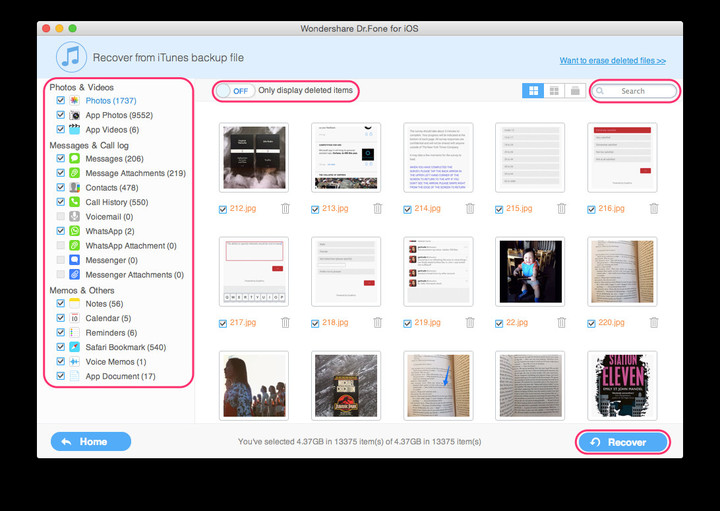
Dr.Fone preview and recovery.
Mark items for recovery by clicking their corresponding checkboxes. Then click the Recover button and choose whether to Recover to Mac/Computer or Recover to Device, provided your device is already connected to your computer. The former option will prompt you to specify a destination location to save files to, while the latter will open a new window where you can check messages, contacts, and notes, which are the file types currently supported for recovery to device by Dr.Fone.

Dr. Fone “Recover to Device.”
An Apple a day doesn't necessarily keep Dr.Fone away
Wrap-up
Apple’s official methods remain the go-to procedures for restoring devices from iTunes or iCloud backups — and for good reason. They’re not so involved that they entail advanced know-how, they’re sufficient for most purposes and situations, and, not to mention, they’re free of charge.
But Dr.Fone may be just what the doctor ordered
But in cases where more control over which files are restored from backup is called for or where a backup independent of Apple’s sometimes risky solutions is desired, Dr.Fone may be just what the doctor ordered.
What’s more, Dr.Fone offers additional options for recovering files, specifically deleted ones, from the device itself, and for repairing iOS when the device is stuck in recovery mode, paralyzed by the white Apple logo screen of death, or otherwise rendered inoperable.

Dr.Fone’s two other iCloud Backup recovery features.
As mentioned, Dr.Fone is a free-to-try program. It comes in a free trial version with limited functionality, which only scans data from iTunes or iCloud backup for preview. To recover and save the scanned data, you have to upgrade to the paid full version, which starts at $80 for a single-user personal license on Mac and $70 on Windows. You can try or buy Dr.Fone for Mac or Windows through Wondershare’s official website.
If you have remarks or questions regarding iTunes or iCloud backup in general or Dr.Fone, in particular, feel free to join the conversation in the comments section.


