How People With Physical and Learning Disabilities Can Enjoy iOS
For Apple, accessibility doesn’t just mean providing assistive technologies for users with vision and hearing impairments. It also means affording the same for users with physical or motor challenges and those with attention challenges or other cognitive and learning disabilities.
In this AppAdvice guide, we walk you through the accessibility features that can be enabled and used on iPhone, iPod touch, or iPad for the benefit of users who have difficulty with learning or device interaction.
Some of the features discussed in this post are supported only on Apple’s latest iOS devices and iOS versions. If you don’t see a feature on your device, it’s likely because you’re using an older iOS device model or running an older iOS version.
For starters, these features can be enabled in Settings > General > Accessibility, under the headings Learning and Interaction.
Better learning with iOS
What iOS accessibility has to offer under Learning
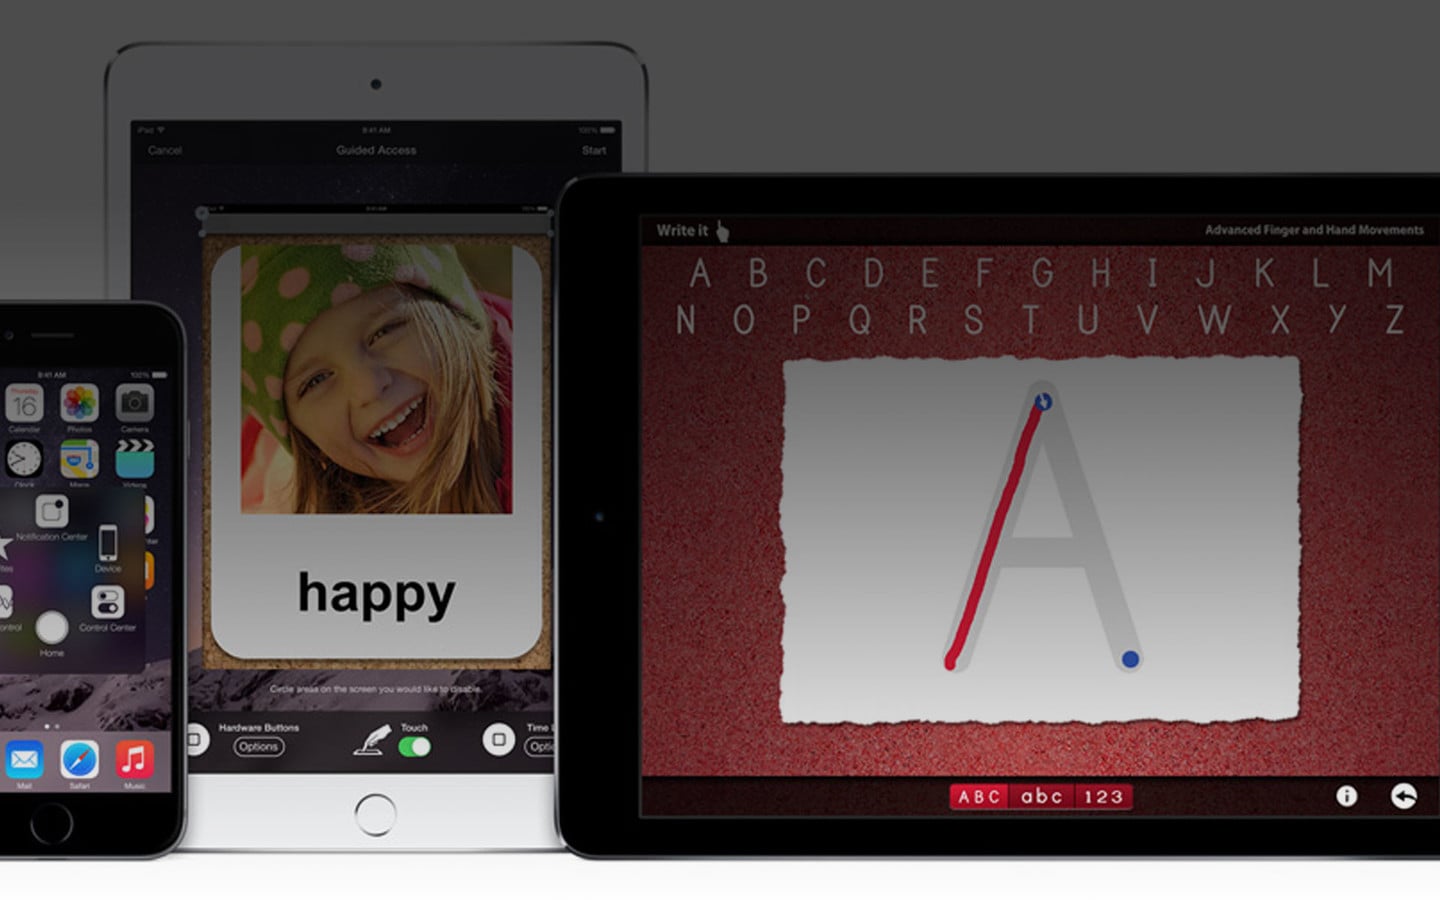
For people with cognitive and learning disabilities, iOS devices can prove quite helpful in facilitating learning primarily with its distraction-minimizing Guided Access feature.
Guided Access

Guided Access helps a user stay focused on the task or app at hand when using an iOS device by temporarily restricting the device to a particular app, disabling certain software input systems and hardware buttons, disabling certain areas of the screen, and setting a time limit for the use of the app. It’s specially helpful to users with autism or other attention and sensory disorders (under the guidance of parents, teachers, or therapists), but it can also be used in kiosk or information terminal setups.
Go to the Guided Access section to turn it on. To initiate Guided Access, open the app you want to use and triple-click your device’s home button. Before you start, you can circle areas on the screen to disable them and tap Options to disable or enable the use of the sleep/wake button, the use of the volume buttons, switching between portrait and landscape modes, typing, screen touches, dictionary lookup, and to set a time limit for the use of the app. Tap Start if you’re good to go with Guided Access.
Going back to the Guided Access section of the Accessibility settings, there you can also tap Passcode Settings to set the passcode used when Guided Access is enabled and choose to use Touch ID to end Guided Access. You can also tap Time Limits and tap Sound to choose a sound to play before the Guide Access time ends, or turn on Speak to have the remaining Guided Access time spoken before the time is up. Moreover, you can turn on Accessibility Shortcut to display your Accessibility Shortcut settings when you triple-click the home button while Guided Access is enabled. (See Accessibility Shortcut below.)
Inclusive interface
What iOS accessibility has to offer under Interaction
Apple’s iOS devices are arguably the easiest-to-use smartphones, tablets, and mobile computers in the world. Be that as it may, they can still pose interaction challenges to people with physical or motor disabilities. Fortunately, though, iOS comes with Switch Control, AssistiveTouch, and other inclusive interface technologies that can assist people who find it difficult to use touch gestures and hardware mechanisms.
Switch Control
Switch Control enables you — especially if you have limited mobility — to navigate and control your iOS device using a switch-based adaptive accessory. Using two or more switches, you can select a location on the screen and perform a certain action for that location, like tapping, dragging, or typing.
Switch Control comes in three modes: item scanning, point scanning, and manual selection. Item scanning sequentially highlights items on the screen until you select one. Point scanning lets you choose a location on the screen using scanning crosshairs. And manual selection, which requires multiple switches, lets you freely move from item to item.

Go to the Switch Control section and select Switches to add a switch. A switch can be an external Bluetooth or USB adaptive device, your iOS device’s screen (tap to trigger the switch), or your iOS device’s front camera (move your head to trigger the switch). Then flip the switch for Switch Control to turn it on.
In the Switch Control section, you can also make adjustments to the feature’s timing, stabilization, scanning, audio, visual elements, and more.
AssistiveTouch
If you’re having difficulty touching the screen or pressing the hardware buttons of your device, or if you require the use of an adaptive accessory such as a joystick, AssistiveTouch is for you. It has been a source of convenience for me, someone who isn’t actually experiencing physical or motor challenges. So it’s certainly a boon to users who are.
Meet the AssistiveTouch button, aka my longtime and your new best friend.
AssistiveTouch provides an interface overlay that lets you simulate a number of gestures and mechanical operations. After turning it on in the AssistiveTouch section, a semitransparent rounded square enclosing several concentric circles will appear. This is the AssistiveTouch button, aka my longtime and your new best friend.
Wherever you are on iOS, you can tap the AssistiveTouch button to go to the home screen, summon Siri, view the Notification Center, bring up the Control Center, access your favorite gestures (more on this below), and perform Device actions including lock, rotation, volume up/down, mute, shake, screenshot, app switcher, and multi-finger gesture simulation.
You can set your favorite or custom gestures in the AssistiveTouch section of the Accessibility settings. Just tap Create New Gesture, perform your custom gesture, tap save, and give it a name. An example of a custom gesture is the two-finger downward swipe I’ve created for activating night mode in Tweetbot, which is especially useful when I’m using my iPhone in bed with just one hand. I’ve also created a two-finger upward swipe custom gesture for disabling the said mode.


It’s worth noting that aside from helping users with physical or motor challenges, AssistiveTouch, particularly with its Device actions, helps reduce the wear and tear of the home, lock and volume buttons and the mute switch.
If the AssistiveTouch button is getting in the way, just drag it to move it to another location along the edge of the screen.
Call Audio Routing
If you have difficulty holding your iPhone to your ear when attending to phone calls, you can have the audio of incoming and outgoing calls automatically routed instead through your iPhone’s speaker or your headset. Just go to the Call Audio Routing section and choose Headset or Speaker instead of the default Automatic.
Home-click Speed
Are you having trouble pressing the home button multiple times in quick succession for certain actions, such as double-clicking to access the app switcher or triple-clicking the Accessibility Shortcut? If so, you might want to use the virtual home button in AssistiveTouch, or just adjust the speed required to activate double- and triple-clicking of the home button. To do this, go to the Home-click Speed section and select Slow or Slowest instead of the default speed. Either option gives you more time to press the home button again and still register a double or triple click.
Reachability
If you’re using an iPhone 6, iPhone 6s, iPhone 6 Plus, or iPhone 6s Plus in portrait mode, some items at the top of the screen, such as Done and Cancel buttons, may be hard to reach with one-handed use. The solution: Reachability. After turning this on, you can double-tap the home button to bring the top of the screen down into reach.
You need only tap lightly on the home button twice to activate Reachability; you don’t have to double-press it.
Accessibility Shortcut
As its name suggests, Accessibility Shortcut lets you quickly enable accessibility features. Instead of going to the Accessibility settings, you can just set one or more accessibility features to be instantly enabled or disabled with a triple-click of the home button.

Go to the Accessibility Shortcut section to choose the features you want to include in the Accessibility Shortcut menu that appears upon home button triple-click. You can include any of the following: VoiceOver, Invert Colors, Grayscale, Zoom, Switch Control, AssistiveTouch, Guided Access, and Hearing Aid Control.
More assistive technologies within reach
Accessibility beyond the Accessibility settings
Beyond the technologies included in the Learning and Interaction sections of the Accessibility settings, there are more accessibility features that can help users with learning and physical disabilities.
Especially for users with learning disabilities like dyslexia, Speak Screen can assist in reading as it reads aloud what’s on the screen. Go to Settings > General > Accessibility > Speech to turn on Speak Screen. With Speak Screen turned on, you can swipe down with two fingers from the top of the screen to have the content of the screen spoken.

Whether you use VoiceOver or not, you can have your iOS device read aloud any text you select.
Apple’s built-in dictionary in iOS, which can be accessed by tapping a word and selecting Define, can also help with spelling, pronunciation, and grammar. And the Reader feature of Safari, which can be enabled by tapping the left icon in the address bar, can help minimize distraction when viewing webpages by showing only the relevant textual and visual content.

For users who have trouble typing, iOS offers support for dictation, predictive text, keyboard shortcuts, and third-party keyboards.

And of course, there’s Apple’s intelligent personal assistant and accessibility champion, Siri, ready to take voice commands for a variety of actions. Go to Settings > General > Siri to access settings for Siri, and hold the home button — or tap the appropriate button in AssistiveTouch — to start speaking to and seek assistance from Siri.
As mentioned, these accessibility features are for users with physical or motor challenges and those with attention challenges or other cognitive and learning disabilities. Be sure to also check out AppAdvice’s guide to iOS’ accessibility features for people with vision or hearing impairment.
All in all, it can be properly said that Apple’s iOS is not only the most advanced mobile operating system available; it’s also the most accessible.