How to Auto Unlock Your Mac With an Apple Watch
With each passing year, Apple continues to add more software features that help its various devices work better with each other. Continuity allows users to accomplish a number of tasks including starting an email on your Mac and finishing it on an iOS device. And Apple Watch wearers can also join in on the fun.
In just a few easy steps, you can set up your watch to auto unlock macOS Sierra without needing to enter a password. Here’s the complete step-by-step process on how to set up the feature.
Most importantly, you’ll need any Apple Watch running watchOS 3 or watchOS 4 and a mid-2013 or later Mac with macOS High Sierra or Sierra installed.
Two-factor authentication

Two-factor authentication provides a great layer of security to your Apple ID and iOS devices.
Before you start setting up either device, you’ll need to enable two-factor authentication on your Apple ID. It’s important to note that Apple also has another security measured name two-step authentication. But that won’t allow the Apple Watch to unlock a Mac.
Two-factor authentication is a great way to protect your valuable Apple ID and anything stored on the account. With the feature enabled, it ensures that only you can access the account – even if someone else is able to gain your password.
When signing into a new Apple device for the first time, you’ll provide two pieces of information – the account password along with a special six-digit verification code that is displayed on other trusted devices. For example, when setting up a new iPhone X you’ll need to provide the Apple ID password and code displayed on another Apple device you own.
You can turn on the security measure on any iOS device by going to Settings, iCloud, and then selecting the Apple ID. Select Password & Security and then choose Turn on Two-Factor Authentication. Follow the steps on the screen to finish the process.
The entire process takes a few minutes, but it’s definitely worth it and something every Apple user should enable.
Jump to the Mac

Just a few more steps on your Mac.
Now it’s time to head to the Mac. First up, the computer needs to have both Bluetooth and Wi-Fi turned on. It also needs to be signed into the same iCloud account as the Apple Watch. The watch also needs to have a passcode enabled.
On the Mac, select the Apple menu and choose System Preferences. Then select Security & Privacy. In the general tab, make sure that the box labeled “Allow your Apple Watch to unlock your Mac” is selected. Users can even have more than one watch unlock their Mac.
Sit back and watch

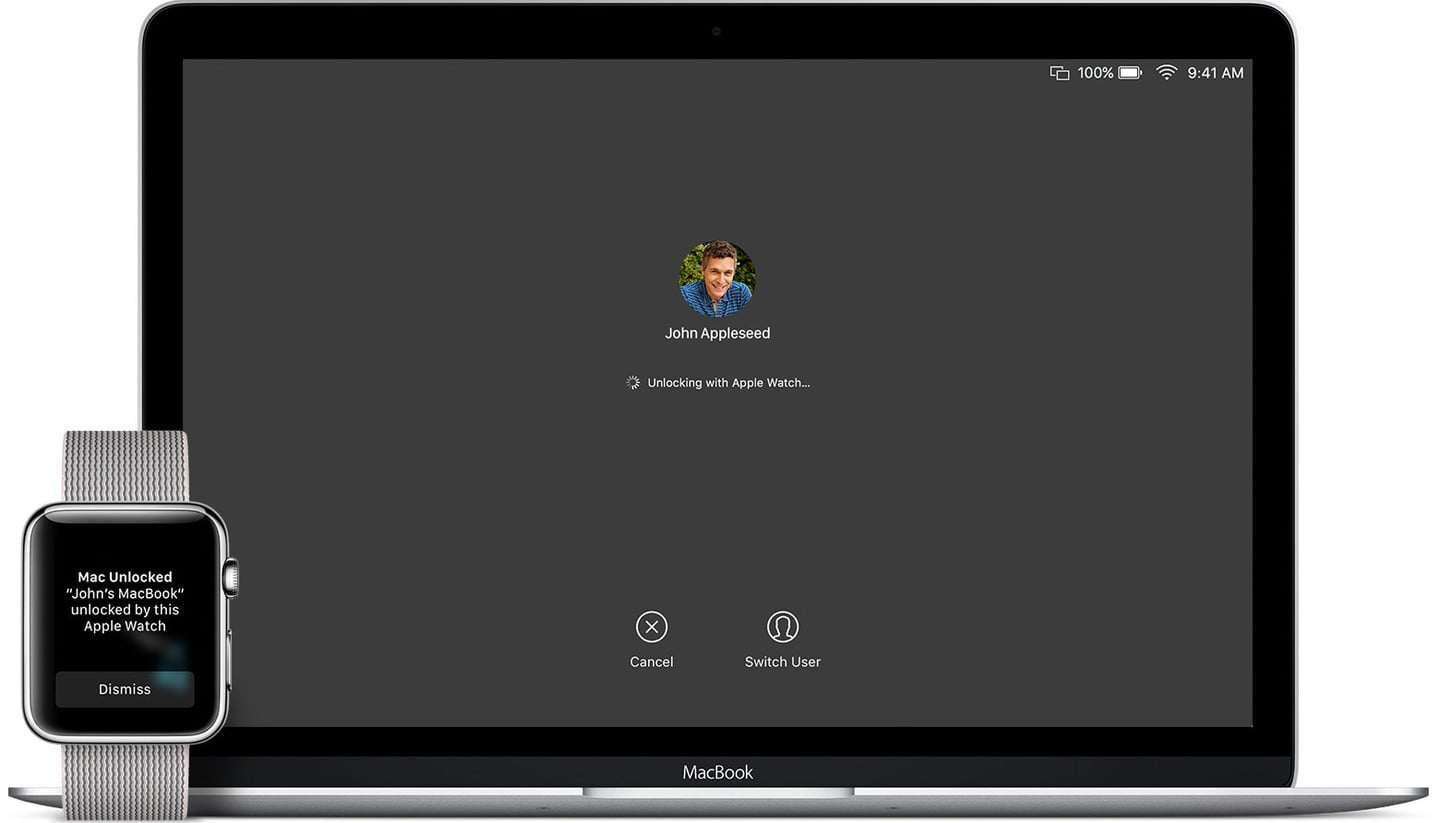
Just place your watch near the Mac you want to unlock.

Open sesame.
After that’s selected, you’re good to go. Just place the watch near the Mac, and it should automatically unlock without needing to enter your password.
If there is some kind of issue, after 10 seconds, the password dialog box will reappear.
I use the feature on both my Retina MacBook and Mac mini with macOS High Sierra, and have really enjoyed it.
While it’s important to protect any Mac with a password, especially if it’s ever used in public, entering a password numerous times per day can get a bit old. It’s much easier to just sit back and watch while the Mac unlocks.
Along with a dialog box on your watch, the Mac will display that it has been unlocked with an Apple Watch.