
How to Enjoy Your iOS Device More by Making It Do Less
Over the years, you’ve probably heard or read reports about kids unwittingly charging their parents’ credit cards hundreds or even thousands of dollars from in-app purchases they made while playing games or using apps on their parents’ iOS devices. Fortunately, Apple has since implemented measures for preventing such incidents from happening. Foremost among these is an option for disabling in-app purchases across all apps and games. This option can be found in the Restrictions settings on iOS.
-
Turn them on
-
To allow or not to allow? That is the question
- Safari |
- Camera |
- FaceTime |
- Siri & Dictation |
- AirDrop |
- CarPlay |
- iTunes Store |
- Apple Music Connect |
- iBooks Store |
- Podcasts |
- Installing Apps |
- Deleting Apps |
- In-App Purchases |
-
Controlling content
- Ratings For |
- Music & Podcasts |
- Movies |
- TV Shows |
- Books |
- Apps |
- Siri |
- Websites |
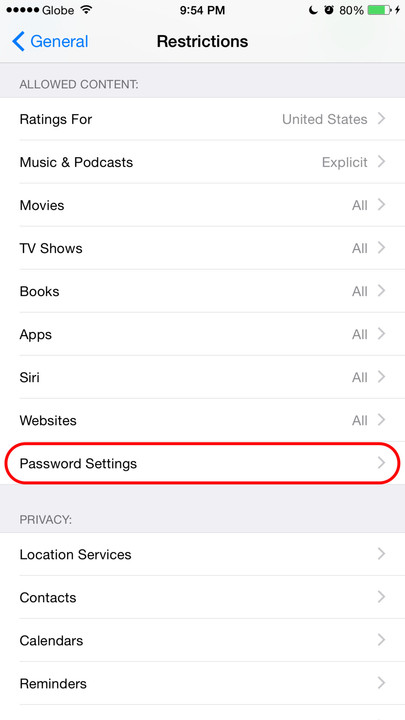
- Password Settings |
-
Private matters
-
Ch-ch-changes
-
Game on ... or off
-
Wrapping this baby up
Restrictions are also known as parental controls because they mainly provide parents with options for preventing children from accessing specific features like in-app purchases and even specific apps like Safari and services like Siri. But they can also be set to disable apps, features, services, and types of content which you yourself don’t want.

That’s right. Restrictions and parental controls are not just about avoiding exorbitant in-app purchases unwittingly made by kids. As evidenced by this AppAdvice guide, the Restrictions settings on iOS are so much more than that.
Restrictions and parental controls on iOS offer so much more than in-app purchase abuse prevention
For one thing, Restrictions lets you choose what types of movies, TV shows, music, podcasts, books, apps, and websites can be consumed on your device according to their age group ratings. It also lets you control which apps can have access to your private information and accounts.
Perhaps most interestingly, did you know that, with Restrictions on iOS, you could hide away some built-in apps like Safari, Camera, and Podcasts? You could even hide the App Store, the iTunes Store, and the iBooks Store if you’re that cautious about spending on your device. What’s more, you could make Siri and other iOS features pull a disappearing act as well.
Curious as to how you could do all that and more? Well, you’re in luck: In this AppAdvice guide, we walk you through the various Restrictions settings on iOS, stating how to use them and explaining how they work.
Unless otherwise specified, the settings discussed in this post are available on iPhone, iPod touch, and iPad. Some of the settings may not be available on your device, depending on what version of iOS it’s running on.
Turn them on
Enabling Restrictions
Enabling Restrictions on your iOS device is quite easy. You just have to know where to go.

Launch the Settings app from your device's home screen.

Tap General.
Tap Restrictions.

Tap Enable Restrictions.

Assign a Restrictions passcode by entering it twice.
The four-digit Restrictions passcode may be different from the passcode you use for unlocking your iOS device.
DO NOT LOSE OR FORGET YOUR RESTRICTIONS PASSCODE: You’ll need it to change your settings or turn off Restrictions. Should you lose or forget the passcode, you’ll have to erase your device and set it up as a new device to remove the passcode; as noted by Apple, simply restoring your device to its original settings won’t do the trick.
After turning on Restrictions, you’ll then be able to toggle the switches for some apps and services, select which types of content to allow, and more.

You’re allowing access to an item when it is enabled or when a check mark is next to the item. You’re restricting access to it if its corresponding option is turned off. Rest assured that no loss of data will occur should you decide to restore access to an item you’ve previously restricted access to.
To allow or not to allow? That is the question
Restrictions under Allow
Under the Allow heading in Restrictions, you can allow or disallow the use of some of Apple’s apps and services, including the likes of Safari and Siri, along with several App Store-related actions.
Safari
Safari is by far one of the most powerful apps built into iOS, not least because it offers unrestricted Web access. That is, until you disable it.
After turning off Safari in Restrictions, the Safari app disappears from your home screen. And since Safari remains the default Web browser on iOS, with no means yet to assign a different app, tapping links in other apps that are set to open in Safari does nothing. In such cases, choosing an option, if available, to open links in third-party Web browser apps like Chrome should do the trick.


Camera
If you want to restrict access to your iOS device’s camera, you can do so by turning off Camera in Restrictions. Consequently, the Camera app and its shortcuts on the lock screen and the Control Center disappear, and any app functionality that depends on the camera, such as that found in Instagram and VSCO Cam, is disabled, although you can still upload pictures from your camera roll.


Turning off Camera also turns off FaceTime.
FaceTime
As noted above, FaceTime is automatically turned off when Camera is turned off. But Apple’s video-calling app can also be turned off by itself with its very own switch in Restrictions, whereupon the FaceTime app disappears. But since Camera is still enabled, this doesn’t restrict the use of third-party video calling apps such as Skype.

Siri & Dictation
Siri and Dictation can be disabled independent of each other or both at once
Siri and Dictation are a couple of iOS features that require the sending of information like voice input, contacts, and location to Apple for processing of requests. If you’re wary of that requirement, or if you just don’t want to use these features, you’re free to disable either or both of them.
They can be disabled independent of each other: For Siri, go to Settings > General > Siri and turn off Siri, and for Dictation, go to Settings > Keyboard and turn off Enable Dictation.
To disable them both at once, turn off Siri & Dictation in Restrictions. After turning off Siri & Dictation, the features themselves and their respective settings disappear from your device.
With Siri disabled, you can still hold the home button to access Voice Control for basic voice-activated commands.

If you want Siri or Dictation back, turn on Siri & Dictation in Restrictions, and then go to Settings > General > Siri and turn off Siri, or go to Settings > Keyboard and turn off Enable Dictation.
AirDrop
Introduced to iOS in iOS 7, AirDrop is a feature that lets iOS and OS X devices share files over Wi-Fi and Bluetooth. You can turn off AirDrop by bringing up the Control Center, tapping AirDrop, and tapping Off, making your device discoverable neither to people in your contacts nor to everyone else. But you can also disable AirDrop in Restrictions and in so doing remove the AirDrop option from the Control Center and the functionality itself from your device.

CarPlay
Available on iPhone 5 and later, CarPlay allows iPhones to function with built-in display units of automobile dashboards and enables drivers to easily access Siri, navigation, music, phone and messaging controls. This can be turned off in Restrictions as well.

iTunes Store
On iOS, the iTunes Store app lets you purchase and download music, movies, and TV shows. You can remove it from your device by turning off iTunes Store in Restrictions. After doing that, all links and options pertaining to the iTunes Store are rendered inoperative, although content previously downloaded from the iTunes Store is still available in the Music and Videos apps.
Apple Music Connect
Connect is a music-oriented social blogging platform built into Apple Music. If, like me, you’d rather not see an entire section in the Music app dedicated to posts published by artists in an attempt to “connect” with their fans, you can turn off Apple Music Connect in Restrictions.

Apple Music Connect can be replaced with Playlists.
With Apple Music Connect disabled, the Connect tab in the Music app is replaced by the Playlists tab. The Playlists tab contains both your playlists and playlists from Apple Music, which, with Connect in place, were previously accessible within the My Music tab.
The option for turning off Apple Music Connect is available in iOS 8.4, but it’s nowhere to be seen as of iOS 9 beta.

iBooks Store
The iBooks Store is the online store built into the iBooks app where you could download e-books and audiobooks to be read and listened to right within iBooks. If you’re fine with just “sideloading” non-DRM content onto iBooks instead of downloading DRM-protected content from iBooks, you can disable the iBooks Store in Restrictions. Once the iBooks Store has been disabled, the iBooks app shows only your existing books and audiobooks; the Featured, Top Charts, Search and Purchased tabs, which all depend on the iBooks Store, are removed from iBooks.

With the iBooks Store disabled, the Featured, Top Charts, Search and Purchased tabs are gone.
Podcasts
If, unlike me, you’re not a podcast junkie, or if you’d like nothing to do with the Podcasts app until a new episode of “Serial” comes along, or if you just want to deter your child from accessing podcasts, you can turn off Podcasts in Restrictions and make the Podcasts app disappear from your home screen.
Installing Apps
For one reason or another, you might want to restrict other users or even yourself from accessing the App Store on your device. In that case, you can turn off Installing Apps in Restrictions. As a result, the App Store app disappears, thereby making the updating of apps as well as the installation of new apps impossible.
Deleting Apps
You might also want to make the deletion of apps impossible, as when lending your device to your young one and you want to avoid accidental loss of data. If so, you can turn off Deleting Apps in Restrictions. Thereafter, when you tap and hold on an app and enter “wiggle” mode, you can only rearrange the apps and be unable to delete any of them since the X buttons for deleting them are no longer available.

In-App Purchases
With the various reported instances of credit card bill shock incurred by kids unwittingly amassing expenses via in-app purchases, the option for disabling in-app purchases is perhaps the first thing parents should look for in Restrictions. With In-App Purchases duly disabled, any attempt to purchase in-app items or features (like the infamous Smurfberries in Smurfs’ Village) is effectively thwarted.
The option for disabling in-app purchases is perhaps the first thing parents should look for


Controlling content
Restrictions under Allowed Content
To a certain extent, you can specify the types of content you’d like to allow on your device using the parental controls under the heading Allowed Content in Restrictions.
Ratings For
Given that different countries have different movie and television regulatory boards with different rating standards, a program that’s deemed appropriate for a certain age group in the U.S. may not be deemed as such in, say, the Philippines. With that in mind, you can go to Restrictions to set the country whose movie and TV ratings you want to use with the iTunes Store, with choices ranging from Algeria all the way to Zimbabwe. By default, the ratings are set for your country of your residency, which you’ve chosen during the initial setup of your device.
Different countries have different movie and television regulatory boards with different rating standards
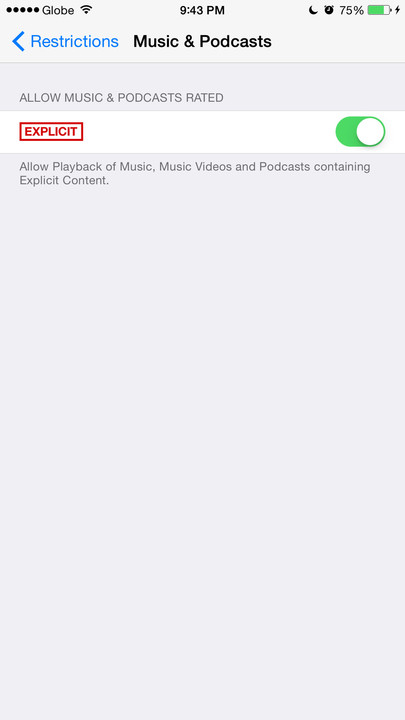
Music & Podcasts
Say you’re in your car with your children and you want to listen to a bunch of songs and podcasts during your drive, but you want to save your kids’ ears from hearing suggestive lyrics and curse words. Well, you can go to Restrictions and turn off the switch under Music & Podcasts to disallow playback of music, music videos, and podcasts that have been rated as containing explicit content.
The Music & Podcasts explicit-content restriction applies only to Apple’s Music, Videos and Podcasts apps, and not to third-party music, video and podcast apps.
Movies
You can go to Restrictions to specify the types of movies from iTunes that you’d like to allow according to their ratings. You can choose to disallow all movies, allow all movies, or allow any or all of the movies with specific ratings in accordance with the country chosen in Ratings For (see above).


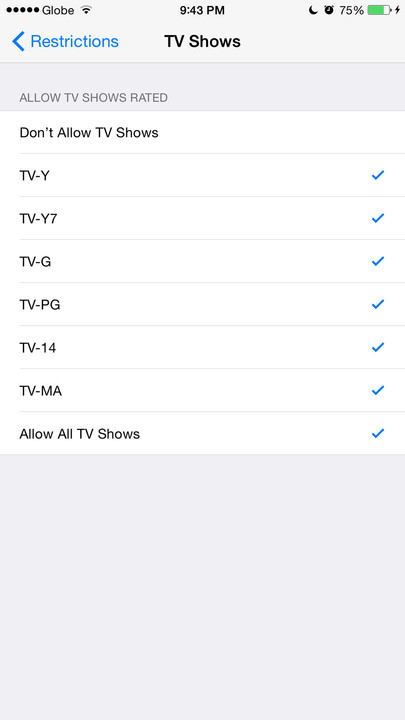

TV Shows
As with movies, you can go to Restrictions to specify the types of TV shows from iTunes that you’d like to allow according to their ratings. You can choose to disallow all TV shows, allow all TV shows, or allow any or all of the TV shows with specific ratings in accordance with the country chosen in Ratings For (see above).
Books
Go to Restrictions, tap Books, and turn off the switch for Explicit Sexual Content to disallow sampling, downloading, and reading of books and audiobooks that have been labeled in the iBooks Store as having explicit sexual content, such as the audiobook versions of the “Fifty Shades” trilogy.
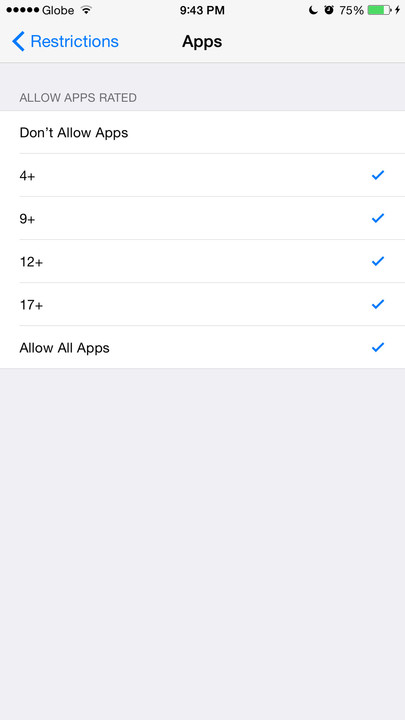
Apps
Similar to movies and TV shows, apps can be restricted according to their age group ratings. Under Apps in Restrictions, you can choose to disallow all apps, allow all apps, or allow apps rated 4+, 9+, 12+, and/or 17+.
When you choose to disallow all apps, all third-party apps (i.e., all apps except Apple’s built-in ones) will be hidden from view on your device.
Siri

Aside from disabling Siri along with Dictation, you can also go to Restrictions to to disallow explicit language and Web search content. You can turn off Explicit Language so that curse words and other forms of explicit language will be censored with asterisks when talking to Siri; rest assured that Siri will still be able to understand such words. You can also turn off Web Search Content to forbid Siri from searching content from Wikipedia, Bing, and Twitter.
Websites

You can restrict apps that make use of iOS’ Web browser module from accessing certain websites by going to Websites under Restrictions. There you can choose to allow all websites, limit adult content, or allow access to specific websites only. These restrictions apply not only to Safari but also to any app that has a Web browser, like Google and Twitter.
If you opt to limit adult content, access to many (but not all) adult websites are automatically limited, although you can specify websites to always allow or never allow access to. If you choose to allow access to specific websites only, only the kid-friendly websites preset by Apple along with others you add can be accessed. When you visit a restricted website, you are presented with an option for allowing the website, but it requires your Restrictions passcode, of course.


Password Settings
You can use Touch ID instead of your Apple ID password when buying from the iTunes, iBooks and App Store by going to Settings > Touch ID & Passcode, entering your device passcode, turning on iTunes & App Store, and entering your Apple ID password as confirmation. But if iTunes & App Store is turned off for Touch ID, meaning you don’t use Touch ID for paid and in-app purchases, you can go to Password Settings under Restrictions to choose between two options for how often you need to enter your password for these purchases.
Password Settings appears in Restrictions on devices that don’t support Touch ID, and on Touch ID-enabled devices on which Touch ID is not set for authorizing iTunes and App Store purchases.

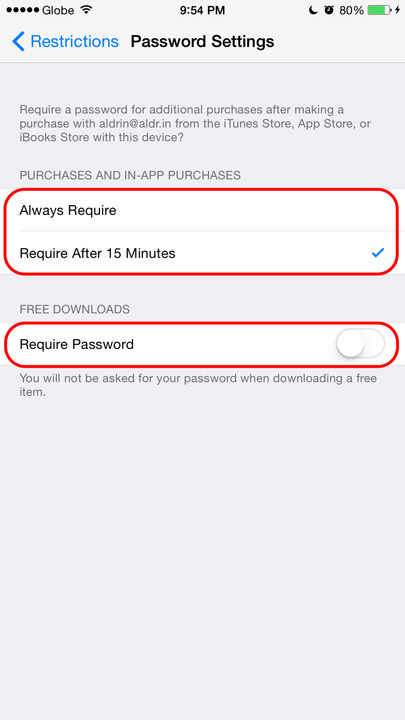
You can choose Always Require so that you’ll be prompted to enter your password every time you make a purchase — the recommended setup for avoiding unauthorized purchases. Or you can choose Require After 15 Minutes so that you’ll only need to enter your password again if at least 15 minutes have elapsed since your last purchase — preferable if you don’t like to repeatedly enter your password. Whichever option you go for, you need to enter your password first for the change to take effect.
You can also choose to use the same password restriction for free downloads as the one you’ve set for purchases and in-app purchases. Or you can turn off the switch for Require Password so that you won’t be asked for your password when downloading a free item, since you won’t be charged anyway.
Private matters
Restrictions under Privacy
Apple prides itself in the many ways it protects its customers’ privacy. These include options for controlling what types of information may be accessed by apps and services. On iOS, such options can be found in Settings > Privacy or under the Privacy heading in Settings > Restrictions. The latter section also provides options for locking privacy settings and thus preventing further changes.

Location Services
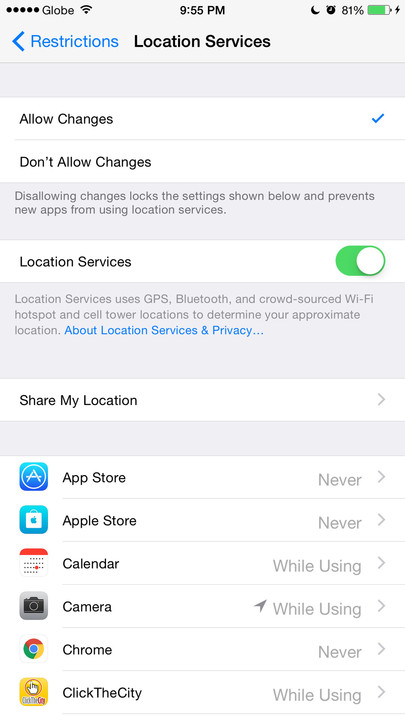
Location, location, location.
Tap Don’t Allow Changes to lock in the current settings and prevent new apps from using location services. If Allow Changes is chosen, you can make further changes to the settings.
Toggle the switch to allow or disallow Location Services, which uses GPS, Bluetooth, and crowdsourced Wi-Fi hotspot and cellular tower locations to determine your approximate location.
Tap Share My Location to enable or disable location sharing with your family and friends in Messages and Find My Friends.
Tap any of the listed apps to set whether you’d like to never allow location access for it or to allow location access only while using the app. Tap System Services to allow or disallow location access for a variety of system services including cell network search, Find My iPhone, location-based iAds, and more.

Contacts, Calendars, Reminders, Photos, Bluetooth Sharing, Microphone, Twitter, or Facebook
Tap Don’t Allow Changes to lock in the current settings and prevent new apps from using your device’s contacts, calendars, reminders, photos, Bluetooth, microphone, Twitter, or Facebook. If Allow Changes is chosen, you can make further changes to the settings. Toggle the switch for any of the listed apps to enable and disable its access to your device’s contacts, calendars, reminders, photos, Bluetooth, microphone, Twitter, or Facebook.
Share My Location
Tap Allow Changes to allow further changes to your location sharing settings, or tap Don’t Allow Changes to lock in the current settings for location sharing in Messages and Find My Friends.

Advertising
Tap Allow Changes to allow further changes or tap Don’t Allow Changes to disallow changes to your settings in Settings > Privacy > Advertising, which includes options for limiting ad tracking and resetting the advertising identifier.

Ch-ch-changes
Restrictions under Allow Changes
Under the Allow Changes heading in Restrictions, Apple lets you allow or disallow changes to settings of certain aspects of iOS device use that don’t necessarily relate to privacy. These lock options prevent you from accidentally making settings adjustments or others from meddling with your settings for certain features and services.

You can lock in your settings for accounts, cellular data use, Background App Refresh, and volume limit.
Accounts
Selecting Don’t Allow Changes for Accounts prevents changes to Mail, Contacts, Calendars, iCloud, Twitter, Facebook, Vimeo, Flickr, iTunes, App Store, iMessage, and FaceTime. As a result, the settings for these features and services will be either dimmed or missing.
Prevent accidental adjustments and deliberate meddling with these restrictions
Cellular Data Use
On cellular-enabled iOS devices, you can choose Don’t Allow Changes for Cellular Data Use to lock the settings for apps which can use cellular data, as listed in Settings > Cellular. Limiting cellular data use may help prevent bill shock and data throttling due to excessive cellular data consumption, especially if you’re not on an unlimited data plan.

Background App Refresh
Background App Refresh allows apps to refresh their content in the background when on a Wi-Fi or cellular connection. It can be turned on and its use be enabled on an app-by-app basis by going to Settings > General > Background App Refresh. To prevent changes from being made to your current Background App Refresh settings, you can choose Don’t Allow Changes for Background App Refresh in Restrictions. Limiting the use of Background App Refresh may help regulate data consumption and preserve battery life.
Volume Limit
You can prevent changes to your device’s volume limit by selecting Don’t Allow Changes for Volume Limit in Restrictions. If Allow Changes is chosen instead, changes can be made to the volume limit by going to Settings > Music > Volume Limit. Adjusting the volume limit can help ensure hearing safety when listening to music and videos.
Game on ... or off
Restrictions under Game Center
Some so-called Game Center friends may turn out to be not so friendly after all
In the Settings app, there’s a section dedicated to Game Center, Apple’s social gaming network. There you can do the following: sign in to or out of your Game Center profile, opt to allow your friends to invite you to play games, opt to allow nearby players to find and invite you to multiplayer games over Wi-Fi or Bluetooth, manage your Game Center profile, and enable contacts uploading and Facebook integration for personalized friend recommendations.
But there are a couple of additional settings for Game Center tucked under the Game Center heading in Restrictions. These settings let you restrict multiplayer games and friend invites, especially for your child, considering that some so-called Game Center friends may turn out to be not so friendly after all.
These restrictions apply only to games that use Game Center, and not to games that employ third-party multiplayer protocols like Minecraft.

Multiplayer Games
If you turn off Multiplayer Games, the options for game invites from friends and nearby players will disappear from the main Game Center settings section. Consequently, neither Game Center friends nor nearby Game Center players can invite you to play games.


Adding Friends
If you turn off Adding Friends, you will, of course, no longer be able to add friends on Game Center. Attempting to add friends in the Game Center app will yield a message saying, “You are not allowed to send friend requests on this device.”


Wrapping this baby up
Conclusion to Restrictions
If you want to keep your settings, apps, and iTunes accounts safe from your kids’ overeager hands, or if you want to keep the content on your iOS device safe for your kids’ eyes and ears, or if you just want to turn off unwanted apps, features, and services, just go to Restrictions.
Enabling Restrictions lets you (or your kids) enjoy your iOS device more by effectively making it do less

You can also enforce Restrictions using an appropriate profile if your device is part of a deployment for business or education purposes. You can check for installed profiles by going to Settings > General > Profiles. For more information, contact your institution’s administrator or the person who installed the profile.
But before you resort to Restrictions, you might want to consider using Guided Access instead. Specifically designed to minimize distraction for users with autism or other attention and sensory challenges, Guided Access can be used to temporarily restrict an iOS device to a particular app. At the same time, it can be used to disable certain software input systems and hardware buttons, disable certain areas of the screen, and set a time limit for the use of the app.
Should you go for Restrictions, keep in mind that you may end up missing certain apps, features, services, and settings on your device. In that case, don’t panic. Just try turning Restrictions off to bring them back.
Remember, you can always find Restrictions in Settings > General > Restrictions. If you ask me, though, I’d rather have Restrictions in the top level of Settings, like Privacy, so that users are more likely to spot it and become familiar with its various settings. In any case, enabling Restrictions lets you (or your kids) enjoy your iOS device more by effectively making it do less.