
How To Make Your iPhone Photos Look Professional
According to popular photograph sharing site Flickr, the iPhone boasts the most popular camera in the world. There’s little doubt that Cupertino has put a lot of time and energy into their mobile devices’ cameras. In fact, Apple is so proud of their cameras that their retail stores display “Shot on iPhone” images and the tech giant formed an advertising campaign centered around those photographs. How can you, the common iPhone owner, shoot pictures that look as professional as those showcases, though? All it takes is practice, a few tips and tricks, and the right software and accessories. Read on to learn how to make your iPhone photos look professional.
The First Step to Excellent iPhone Photos – Know Your Camera
The first, and most important, tip is to get to know your camera and its capabilities. My colleague Aldrin Calimlim wrote about the capabilities of the iPhone camera, along with some interesting tips to keep in mind. It’s worth a read to get to know your camera better before you dive into the sophisticated tips and strategies I’ll cover here.

Get Your Settings Right

Getting your settings right will greatly improve your iPhone photos
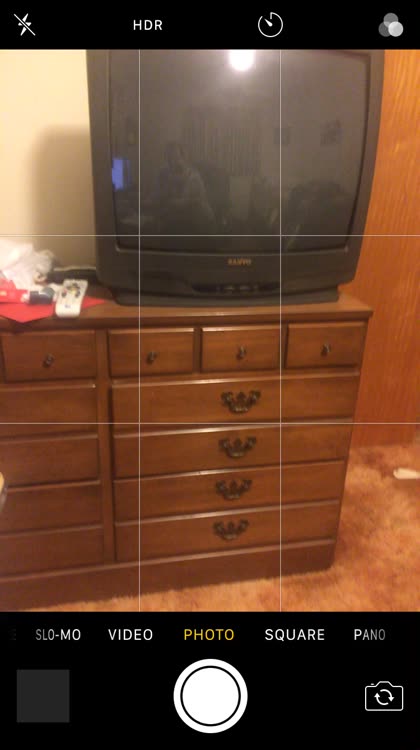
The most important first step is to set up your camera to help you as much as it can. If you tap on the Settings icon, you’ll find an option for Photos & Camera. Scroll down until you see an option for Grid, and enable it. This will overlay a 3×3 grid of squares on your viewfinder, so you can compose your shots according to the “rule of thirds.” The idea here is to compose more balanced and interesting shots by placing the points of interest of your subject in the intersections or along the lines of the grid.

Next, you’ll want to enable the Auto HDR function within the Camera app. Launch the Camera, tap HDR in the top left of the screen, then choose Auto. HDR stands for High Dynamic Range, and uses multiple exposures to get more information in the highlights and shadows of your photograph.

With that done, you’ll also want to disable the built-in flash of your iPhone. Even though it’s advertised as a TrueTone flash, which balances for skin tones, the iPhone LED usually causes images to be rather disappointing. It fires when you don’t want it to, it’s weak, and it can cause washed out details due to its placement facing the same direction as your lens. To disable it, open the Camera app, tap the lightning-bolt icon, and select Off.
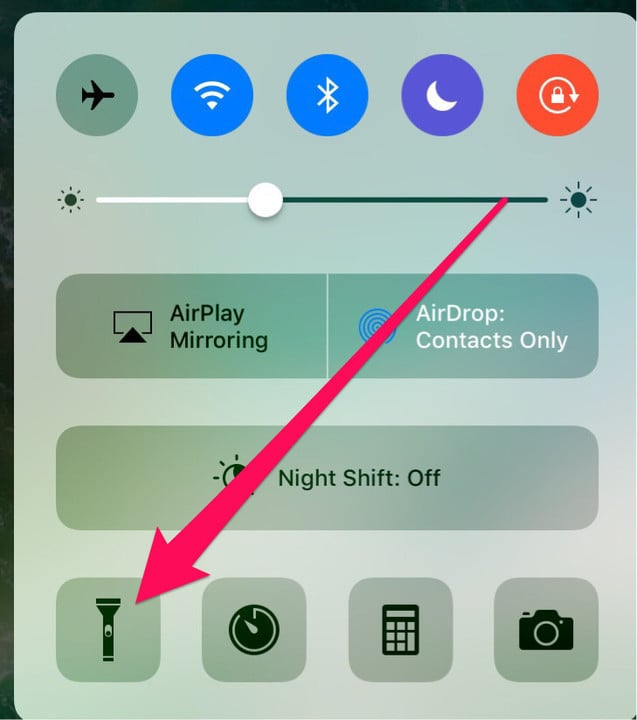
You’ll be far more satisfied using an external or natural light source, like a window. If you really need a flash, try this: get a friend to put his or her iPhone in Flashlight mode, and then shine the light at your subject from a better angle. If you don’t know how to access Flashlight mode, just swipe up and select the button for it from the Control Center.
Launch Your Camera in a Hurry

There’s an old adage among photographers that the best camera is the one you have at the ready. Capturing a great shot often requires impeccable timing, so you don’t want to be fumbling around with your iPhone trying to find the Camera app. Apple has made this easy for us in iOS 10, allowing photographers to launch the Camera app directly from the lock screen. All you have to do is swipe to the left, and your camera will be ready to go.
Lock Focus and Adjust Exposure
Yes, the iPhone’s tap to focus feature is great, but it’s not perfect. The device quite often decides to refocus the image after you’ve chosen your subject, so it’s often best to bypass it. Tap and hold to lock both focus and exposure, then slide your finger up and down the yellow box to adjust the exposure and get your shot perfect. This is particularly handy when you’re shooting a dark subject or under difficult lighting conditions, like sunset. This technique will require a fair bit of practice, so don’t be afraid to take multiple shots with different exposures and then choose your favorites.
Don’t Use Digital Zoom

Now that we’ve got our photography settings configured a bit better than they are by default, it’s important to understand the primary limitation of the iPhone’s camera. Unless you have an iPhone 7 Plus, you don’t have optical zoom. That means when you pinch to zoom, you’re relying on a digital effect. Digital zoom will stretch the pixels, giving your photograph a gradually decreasing quality the more you zoom in. Even the iPhone 7 Plus only offers 2X optical zoom. With this in mind, you should focus your efforts on moving around and getting closer to your subject in order to get them better framed, rather than trying to zoom in.
Make Judicious Use of Burst Mode for Action

Capturing action or fast-moving targets can be a real challenge, since you don’t want to end up with a blurry photograph. Burst Mode is quite handy for capturing those difficult-to-time shots. Simply press and hold the shutter button, and your iPhone will take a rapid succession of photographs. You can then go into your Photos and tap to select your favorites. Delete the rest, to save space on your iPhone.
Trigger the Shutter Properly
Are you still shooting your pictures by tapping the shutter button on the screen with your thumb? If so, there’s a better way. A couple of them, actually. First, you can hold your iPhone like a traditional point-and-shoot camera, and then use the volume buttons on the side of your handset to trigger the shutter. Another option, one that works really well if you’re using a tripod or shooting at an interesting angle, is to use the remote volume buttons on your earphones.
Ditch the Stock Camera App
If you want to take even more control over your iPhone photos, you’ll need to ditch the stock Camera app. Other options include Camera+ and Obscura Camera. Some of these apps, like Camera+, allow you to manually select a lower ISO to reduce noise or adjust your shutter speed to manage the level of blurriness in your shot when the scene is in motion. You can often also adjust the white balance and lock it, allowing you to adjust the exposure value to obtain a darker or lighter shot.

You'll love the Lightbox
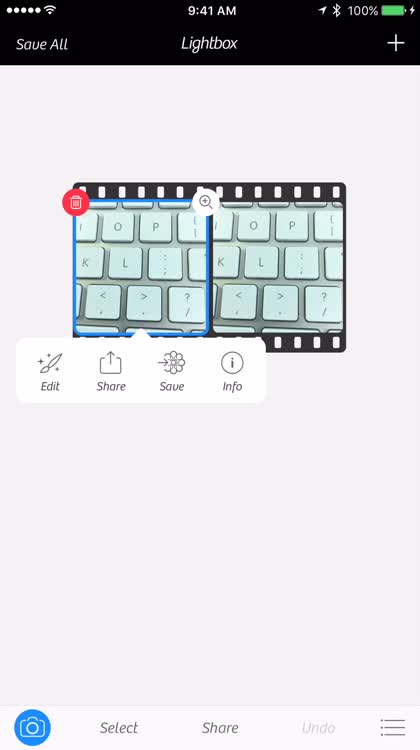
When you're done taking photos, you can view the results in the Lightbox and quickly jump into editing mode. A favorite feature is The Lab that offers an amazing amount of tweaks to help make that perfect photo even better.
Independent or together

For even more control, you can select whether focus and exposure should be on the same part of the image or separate from each other.
Complete control

When you're ready to snap a photo, there are a dizzying number of settings you can adjust including white balance, exposure, ISO, and much more. You can also zoom digitally up to 6x.

This power comes at a cost, though – you can’t launch third-party camera apps from the lock screen. Some do include dashboard widgets to make it quicker to launch the apps, but you’ll still need to unlock your device first.
Shoot in RAW
If you’ve ever studied photography with digital SLR cameras, you probably know about RAW mode. When you’re shooting images in RAW, you capture a dump of data that your device renders and you can adjust before creating the JPEG images we’re all familiar with. Of course, it wasn’t always possible for an iPhone to shoot RAW, but iOS 10 has brought the capability to a select number of iPhone devices. If you have an iPhone 6S, 6S Plus, SE, 7, or 7 Plus, you’ll be able to shoot RAW images. You’ll also need a third-party app like Obscura Camera or Adobe Photoshop Lightroom to capture images in RAW format.

Choose the Right Accessories

Finally, you should consider investing in some good photography accessories. A good first choice is a tripod, but after-market lenses also make excellent investments. You can get macro, fisheye, wide, and even telephoto lenses for your iPhone. Olloclip and Moment make excellent lenses, but you’ll still lose some sharpness in your shots if you choose a third-party lens.

Practice Your Hobby and Skills
If you’re addicted to snapping photos, you’ve probably already developed some skill in the hobby. Keep practicing, follow these tips, and make the right investments in accessories and apps, and you’ll quickly be capturing still images that are worthy of the “Shot on iPhone” moniker, or maybe even some form of cash compensation for your photographs.
For even more apps that will help you as a photography, check out our collection of the Best Photo Apps for Those Who Love Photography.